Downward Dog Variations Guide
Adho Mukha Svanasana sneaks into nearly every yoga session—vinyasa, hatha, power, restorative. It stitches standing sequences to floor work and warms up a remarkable number of muscle groups in one shape. Still, many people either fly through it mindlessly or endure it in quiet misery: wrist joints ache, hamstrings rebel, trapezius muscles lock up.
Pushing harder won't help. Selecting the right variation will. Below: precise alignment cues, purpose-built modifications, and layered downward dog variations—from the gentlest beginner adaptation to demanding progressions for experienced practitioners.
A Quick Look at the Pose and Its Role
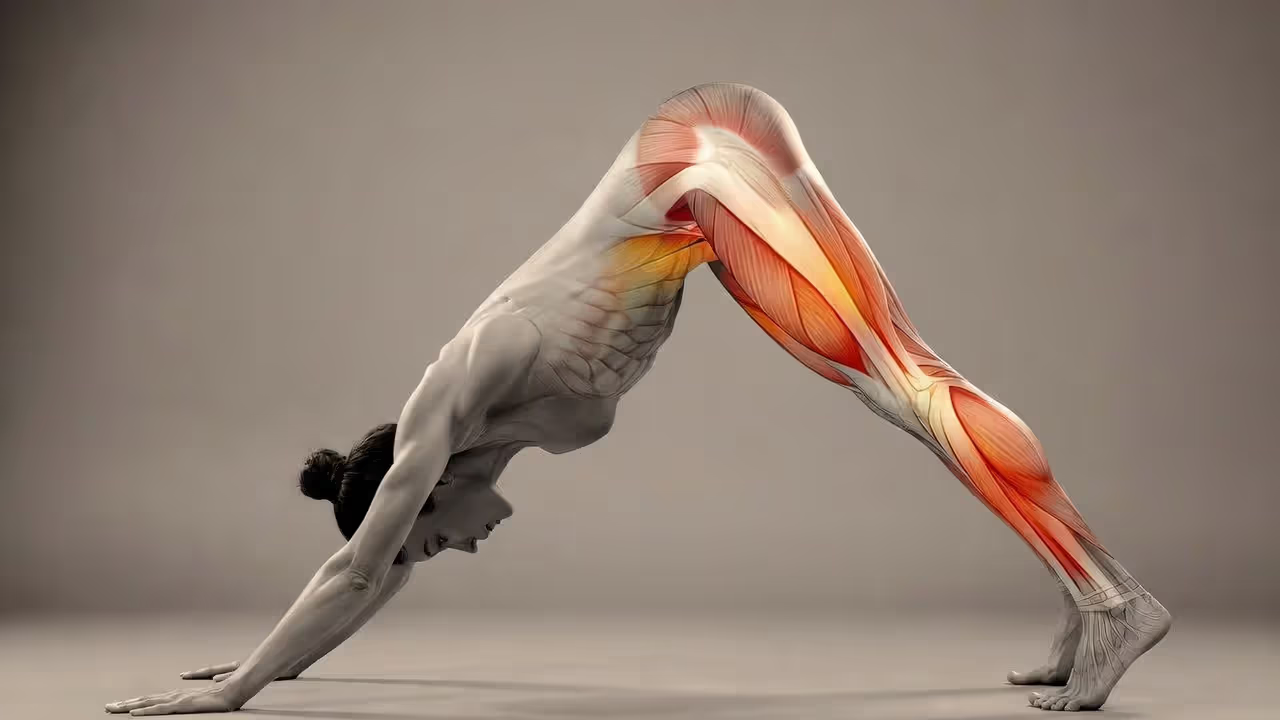
The Sanskrit name breaks down to "downward-facing dog pose" (Wikipedia: Downward Dog Pose). Both palms and both soles anchor the mat while the pelvis drives skyward, creating an inverted-V silhouette. The position draws the entire posterior chain—hamstrings, gastrocnemius, erector spinae group—into a loaded stretch while the deltoids, triceps, and abdominal wall hold everything steady.
Because the skull drops below the ribcage, it counts as a gentle inversion that nudges circulation toward the brain. Teachers lean on it because it tackles upper-body endurance, lower-body pliability, and spinal traction in one hold—making it one of the most adaptable beginner yoga poses across traditions.
Self-check: you should sense an even pull behind both legs and openness through the shoulder girdle. If sharp discomfort dominates, the setup needs tweaking.
Building the Pose From Scratch (How to Do Downward Dog)
Begin in a tabletop: palms under shoulders, knees under hips, toes tucked. Fan the fingers and anchor the mound beneath each index finger.
Exhale, straighten through the legs, and drive the pelvis high and rearward. Imagine pressing the ground away rather than hoisting yourself upward. Release the neck—ears sit roughly between the upper arms. Alternate bending each knee a few times to release stiffness, then find stillness.
Alignment Landmarks
Palms: Distribute load across the entire hand—fingertips, knuckle pads, outer edge, center. Avoid collapsing into the wrist crease. Index fingers aim forward or a few degrees outward when shoulders feel restricted.
Upper arms: External rotation so the inner elbow pit faces loosely forward. This widens sub-acromial space and prevents the upper trapezius from hijacking effort.
Trunk: Chase length, not rigidity. A mild lumbar curve is healthy. When the lower back rounds, soften the knees until the pelvis tips forward again.
Pelvis: Direct sitting bones toward the ceiling. This forward tilt initiates hamstring lengthening.
Heels: Ground contact is optional. Calf tissue length and ankle dorsiflexion vary dramatically, so heels may float for months. Forcing them down while sacrificing trunk length is counterproductive.
Focus on keeping your spine straight. It is the job of the spine to keep the brain alert.
— Dr. Kelly Starrett
What the Pose Delivers (Downward Facing Dog Benefits)
Hamstrings, calves, and the rear body. Few positions lengthen the backside of the leg chain this efficiently. Gravity supplies traction. Practiced consistently, hamstring pliability improves within weeks: toe touches get closer, lumbar compression during seated folds drops.
Chest, shoulders, and postural alignment. The overhead arm position reverses the slouch from keyboard and phone use. Lats and pectorals separate, thoracic extension gradually improves—making this a functional shoulder opening yoga pose, not merely a leg exercise.
Muscular endurance. Shoulder stabilizers, serratus anterior, triceps, and deep abdominal layers all fire. At five breaths it reads as a stretch; at fifteen it becomes serious isometric conditioning.
Author: Jackson Wright;
Source: yogapennsylvania.com
Errors That Undermine the Pose (and How to Correct Them)
Spinal position always trumps everything else. If you lose your spine, you lose the pose.
| Error | Sensation | Correction |
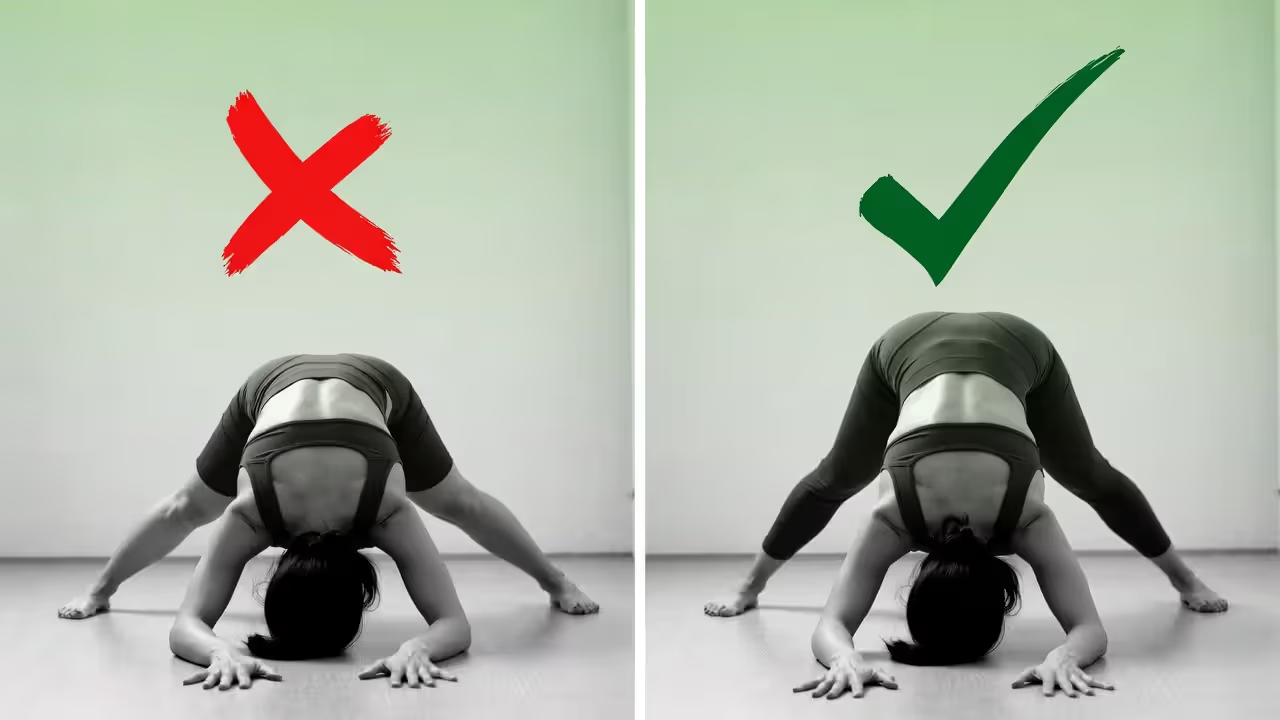
| Lower back rounding into a C-shape | Stretch felt in lumbar spine rather than hamstrings | Soften knees deeply; tilt sitting bones toward the ceiling |
| Body mass migrating toward the palms | Wrist ache, shoulder blade pinching | Drive the pelvis rearward; fire the quadriceps |
| Ribcage popping forward, belly sagging | Compression or pinch in the lumbar region | Cinch the front ribs toward one another with light abdominal activation |
| Trapezius bunched up near the jaw | Neck strain, rapid fatigue in upper shoulders | Spin upper arms outward; actively lengthen from hands through hips |
| Heels jammed into the floor at any cost | Spine compensates by rounding | Allow heels to hover; guard trunk length above all else |
The error that appears most often: locking the knees and sacrificing spinal extension to flatten the heels. The remedy is embarrassingly simple—bend the knees until the pelvis can rotate forward.
Author: Jackson Wright;
Source: yogapennsylvania.com
Adaptations for New Practitioners
Generous Knee Bend. The most impactful adjustment for limited posterior-chain mobility. Allow enough knee flexion so the lumbar curve stays intact. Quick gauge: glance between your arms—if you cannot see your belly button, more bend is needed.
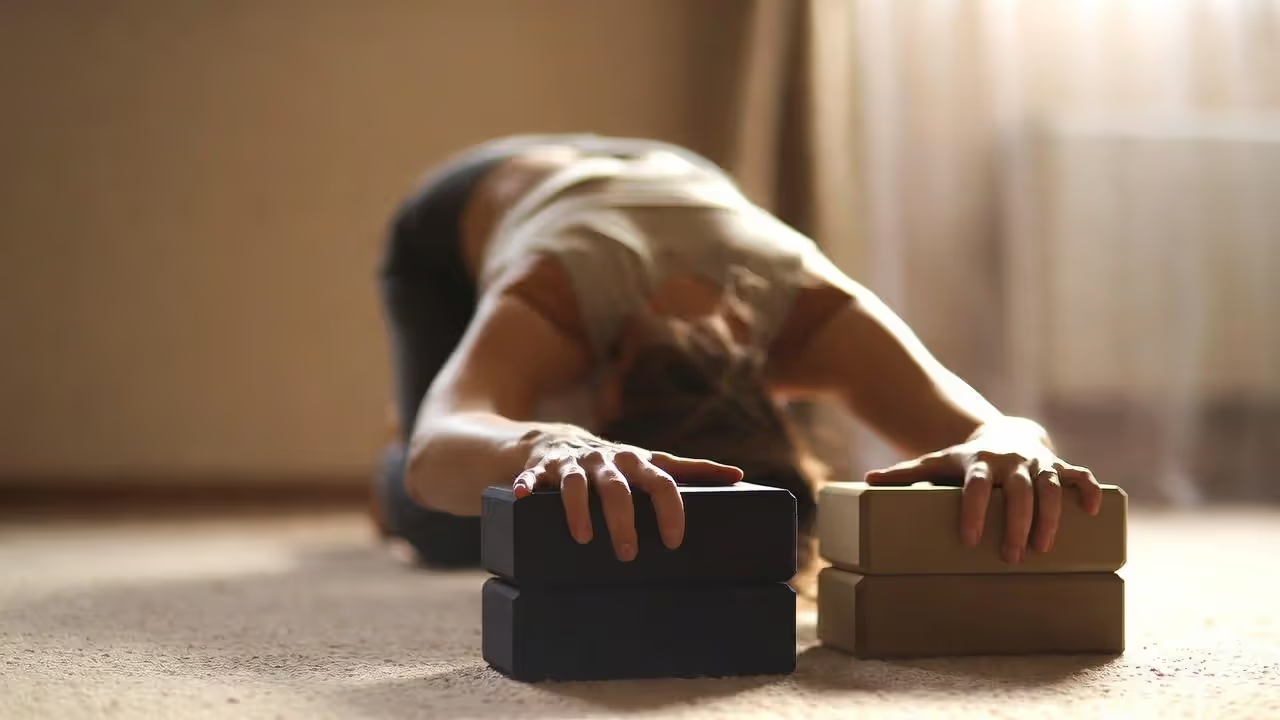
Elevated Hand Placement. Setting palms on firm blocks at their lowest height reduces wrist extension dramatically. Alternatively, balance on closed fists atop a folded blanket. Especially relevant for repetitive-strain issues.
L-Shape Against a Wall. Position palms at hip height on a wall and walk backward until torso and legs form a right angle. Full thoracic stretch and spinal traction without loading the wrists at all.
Author: Jackson Wright;
Source: yogapennsylvania.com
Goal-Specific Variations
Targeting the Back of the Legs
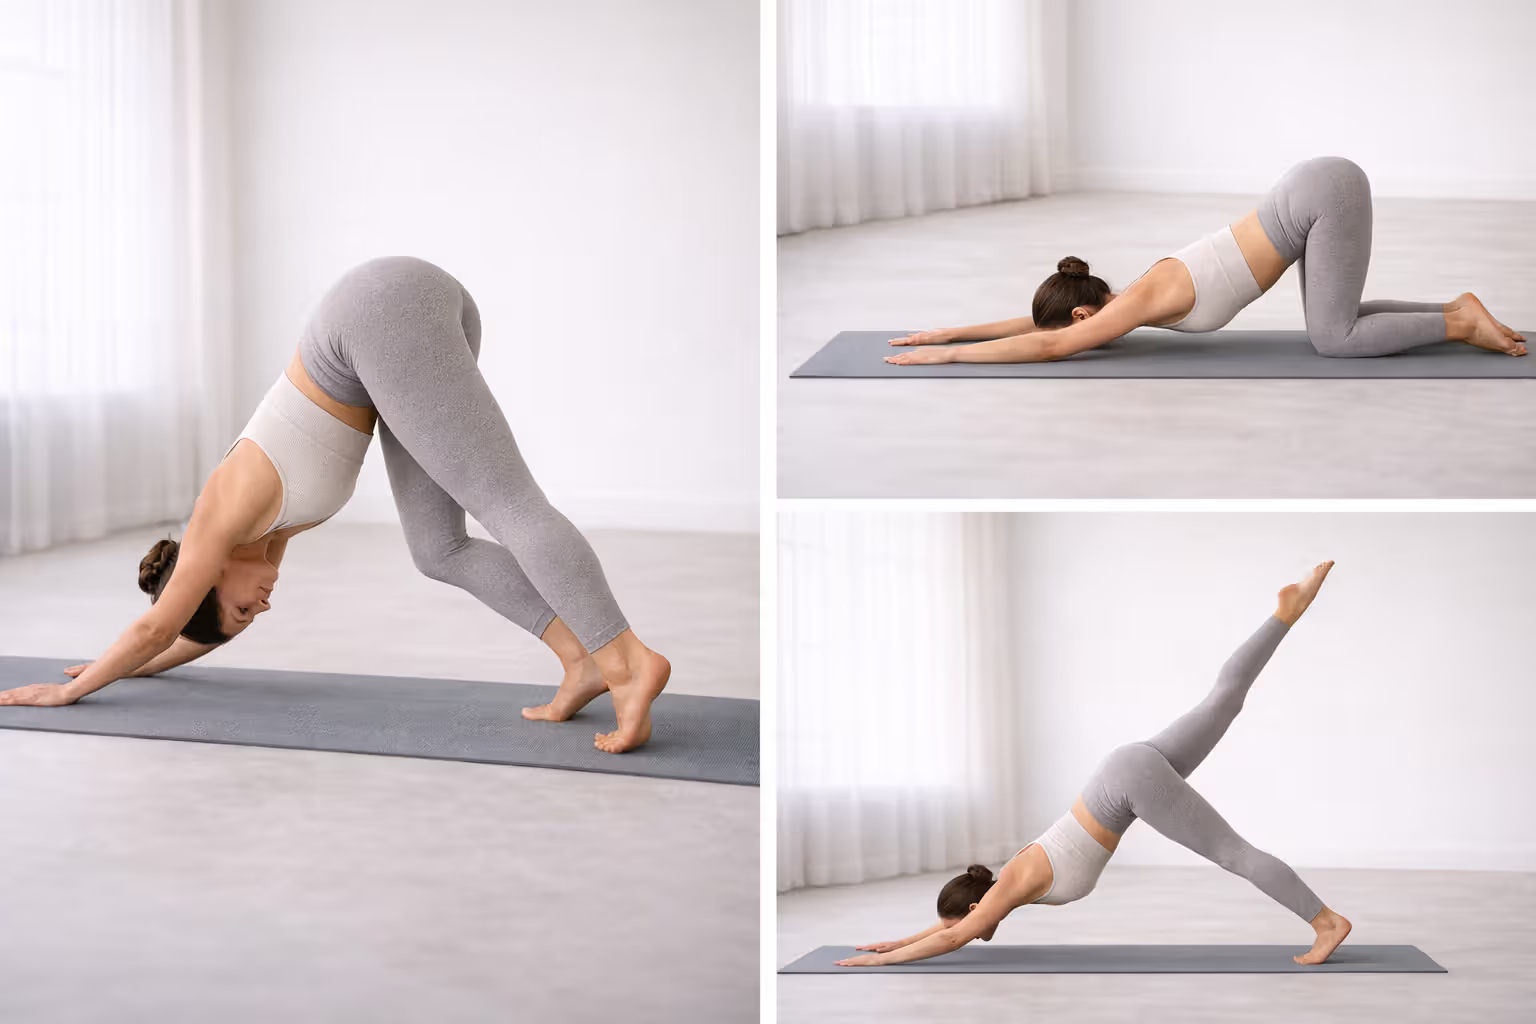
Alternating Knee Bends (Pedaling). Slowly straighten one leg while the opposite knee remains soft. Three to five repetitions per side isolates each hamstring more precisely than a static hold. Solid entry point for a hamstring stretch yoga sequence.
Wide-Stance Inverted V. Widen the feet to mat-width. The altered angle emphasizes the medial hamstrings and inner thigh. Eight breaths.
Targeting the Shoulder Girdle
Extended-Reach Variation (Puppy Hybrid). Walk the palms six inches farther forward and allow the sternum to drop toward the mat while the hips stay elevated. Magnifies the lat and pectoral stretch—an effective shoulder opening yoga pose for anyone who spends long hours typing.
Forearms on Blocks. Replace palm contact with forearm contact on two blocks. This increases overhead flexion and thoracic extension substantially. Approach cautiously; the sensation builds fast.
Author: Jackson Wright;
Source: yogapennsylvania.com
Building Strength and Motor Control
Pike Press. From the inverted V, bend both elbows and lower the crown of the head toward the floor, then press back up. Three to five reps develops genuine deltoid and triceps capacity.
Single-Leg Raise with Level Hips. Elevate one leg to hip height without letting the pelvis tilt or rotate. Activates the gluteus maximus and demands anti-rotation stability from the core. Five breaths each side.
| Objective | Variation | Level | Primary Cue | Skip If… |
| Hamstring length | Pedaling | Beginner | Deliberate, unhurried alternation | Acute hamstring tear |
| Hamstring + adductor | Wide-Stance V | Beginner–Intermediate | Feet at mat edges | Groin strain |
| Shoulder mobility | Puppy Hybrid | Beginner–Intermediate | Chest drops, hips stay high | Impingement diagnosis |
| Shoulder mobility | Forearms on Blocks | Intermediate | Enter gradually | Rotator cuff pathology |
| Pressing strength | Pike Press | Intermediate–Advanced | Elbows track inward | Wrist or shoulder pain |
| Hip/core stability | Level-Hip Leg Raise | Intermediate | Zero pelvic rotation | SI joint hypermobility |
Advanced Progressions
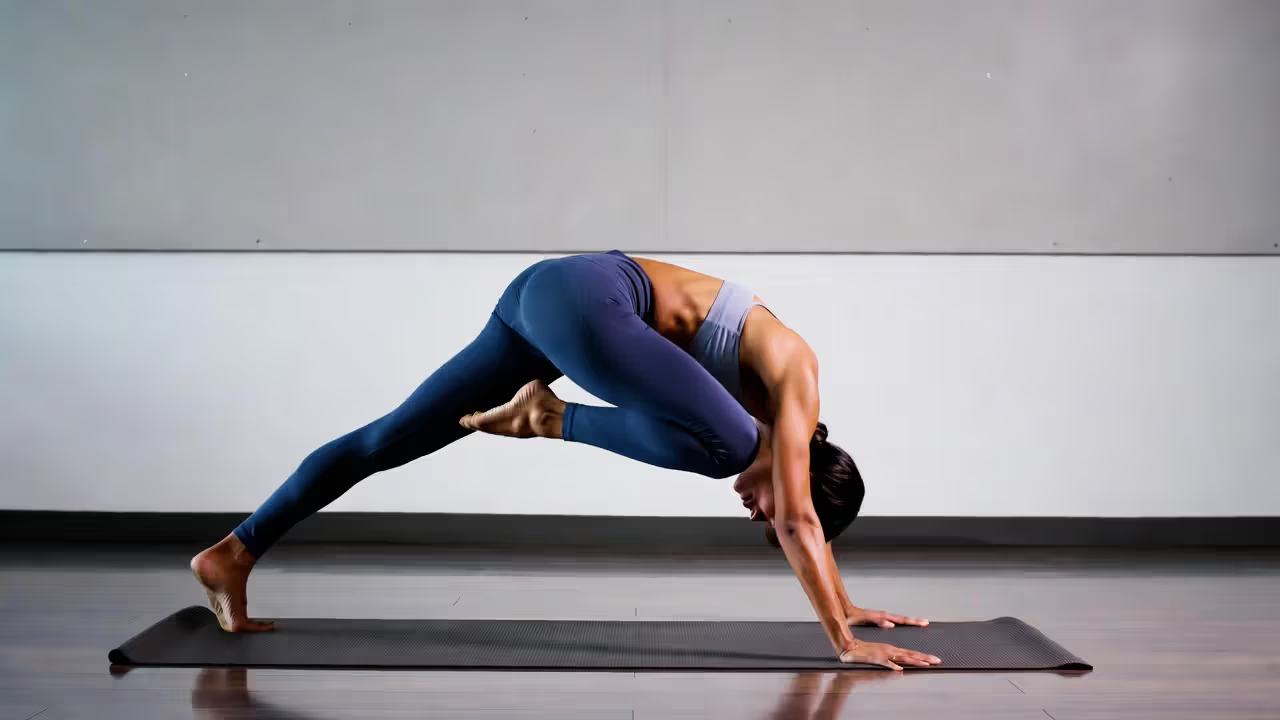
Three-Legged Hold (Square Pelvis). Lift one leg directly behind you without rotating the hip open. Hold eight breaths. Once stable, try bending the raised knee and stacking hips—only if the supporting shoulder stays organized.
Dolphin (Forearm Variation). Drop onto forearms, elbows at shoulder width. Prerequisite for forearm balance and a serious thoracic and scapular stability test.
Knee-to-Nose Compression. From the three-legged position, round the spine and draw the knee toward the forehead. Pause. Trains deep abdominal compression; gateway to lunges and arm balances.
Controlled Plank–to–Inverted-V Cycles. Transition at a five-second cadence each direction. Removing momentum forces the shoulder girdle and trunk to manage every degree. Four to six rounds will fatigue most intermediate bodies.
Author: Jackson Wright;
Source: yogapennsylvania.com
Two Ready-to-Use Mini-Sequences
5-Minute Gentle Flow (Beginner)
Cat-Cow × 5 rounds → Bent-Knee Inverted V, 8 breaths → Pedaling, 5 per side → Standard hold (legs as straight as available), 5 breaths → Child's Pose, 8 breaths.
Repeat daily while learning how to do downward dog with consistent form. Two to four weeks of this builds the foundation.
8-Minute Hamstring Focus
Inverted V, 5 breaths → Pedaling, 8 per side → Wide-Stance V, 8 breaths → Three-Legged Hold right (hips square), 5 breaths → Low Lunge right, 5 breaths → Three-Legged Hold left, 5 breaths → Low Lunge left, 5 breaths → Standing Forward Fold, 8 breaths → Inverted V, 5 breaths.
Done four times per week, this hamstring stretch yoga routine typically yields measurable forward-fold progress within three weeks.
Safety Guidance
Wrist discomfort: Blocks, closed fists, or wall adaptation. Persistent symptoms need clinical assessment.
Shoulder impingement: Narrow hand-to-foot distance. Avoid Puppy Hybrid and Dolphin until cleared professionally.
Elevated blood pressure or glaucoma: Wall version or holds under five breaths. Verify with your physician.
Recent hamstring tear: No loaded stretching. Resume with wall variation only after clinical approval.
Effort ladder: Wall → Countertop/chair → Bent-knee floor → Full pose → Progressive variations. Slide along this scale daily. Long-term consistency matters infinitely more than a single impressive session.
FAQ
Disclaimer: Educational content only—not a substitute for professional medical guidance. Consult a healthcare provider before beginning or altering a yoga practice if you have an injury or medical condition.